To stay up on the latest, be sure to
SUBSCRIBE to my YouTube Channel!
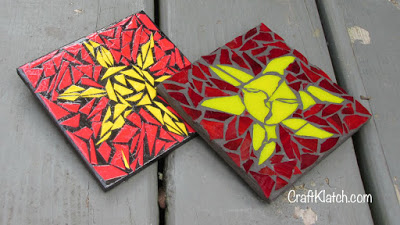
I decided to do two versions of the same of a mosaic coaster. One is very kid friendly!

Let’s start with the Paper Mosaic Coaster:
You will need:
- Red paper
- Yellow Paper
- Glue
- Triple Thick or some type of sealer
- Square or round piece of wood from craft store
- Black acrylic paint
Directions:
- Paint the wood – front and back – two coats of black acrylic paint. Allow to dry.
- Cut random pieces of the yellow and red paper.
- Spread a layer of glue onto the painted wood – I used way more than necessary!
- Individually glue pieces onto the wood. I started with the yellow to make the shape of a sun. Then I followed up with the red for the background. Leave a little space between for the look of grout.
- Allow to dry.
- Seal the piece with a Triple Thick or other kind of sealer. You may want to do two coats. Allow to dry.
You can do any design, think flowers, pumpkins, ghost, Christmas trees, anything! 

Glass Mosaic Coaster
You will need:
– Red glass pieces
- Yellow glass pieces
- Glue – I used a Weldbond
- Black grout
- Square or round piece of wood from craft store
- Black acrylic paint
- Sponge or I used a paper towel
- Large stir stick or small trowel
Directions:
- Paint the wood – front and back – two coats of black acrylic paint. Allow to dry.
- Break or nip random pieces of red and yellow glass.
- In this case, I took each individual piece, with tweezers or my fingers, and dipped them into the glue and put them onto the wood. Again, I did the sun pattern, leaving a space between each piece. I started with the yellow and followed up with the red for the background.
- Allow the glue to dry.
- Mix your grout according to the package directions and using a stir stick or trowel, apply it to the piece, making sure to press it into the areas between the glass.
- Scrape off the excess.
- Using a sponge or in my case a wet paper towel, wipe off the excess as well. You will be left with a cloudy film.
- Allow to dry and then buff with a soft towel.
Here is the video tutorial for both:
That’s it for both!! They are easy, look great and will save your table from water marks!
Thanks for stopping by! Happy Crafting and stay safe!
Mona

Hi
Thanks for the tutorial. A couple of questions. First what type of wood do you use for the backing plate? And what thickness? How do you ensure a clean edge when laying on your grout? Appreciate any info you can provide. Thanks.
Hi Christopher,
I just used a wood square from the craft store. I’m not sure what type of wood it was. If you go to Michaels or Hobby Lobby, just pick up what they have.
As for the clean edge, you just clean it up with your finger or a paper towel before the grout hardens and you can get a pretty clean edge. It’s easier than you think!