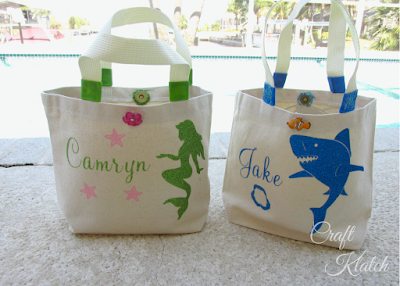
I had an opportunity to spring break with my four grandkids and it included beach time! I thought it was a great time to make a Cricut project! I made these mermaid and shark beach bags. They are perfect for a day at the beach and they have their own special bags to carry their stuff! I used Cricut vinyl – the iron on kind – and my Cricut Explore Air 2 to make these bags. I don’t have a Cricut Easy press, so I just used my iron, but don’t think I’m not tempted to get one!


You will need:
Tote bags: https://amzn.to/2GI98om
Green glitter vinyl: https://shrsl.com/1kzdd
Blue glitter vinyl: https://shrsl.com/1kzdd
Cricut on Amazon: https://amzn.to/2GV6zki
Cricut from Cricut: https://shrsl.com/1kzdi
Iron: https://amzn.to/2ZNiwQb
Optional:
Easypress: https://amzn.to/2ZMCQB9
Snaps: https://amzn.to/2DGkPuX
Thread: https://amzn.to/2DESMfw
Needle: https://amzn.to/2Y2yZyz
Flower buttons: https://www.hobbylobby.com/Fabric-Sewing/Sewing-Quilting-Notions/Buttons/Pink-Sparkle-Flower-Buttons—26mm/p/116140
Fish buttons: https://amzn.to/2GRE9Ya
Hot glue: https://amzn.to/2GTpbB6
Clear drying glue: https://amzn.to/2GT5Uzx
Skewer stick: https://amzn.to/2Jd0K3h

1. I went into Cricut Design Space and clicked on images. This is an easy Cricut design space tutorial for beginners. I tried to include as many pics as I could!

2. I searched for mermaid and scrolled down until I found one I liked.

3. I hit insert images and sized it.

4. I clicked on text and typed in Reagan, for my granddaughter.

5. I clicked on fonts and selected Mahogany Script.

6. You’ll notice that a lot of the fonts have wider spacing than you might want. There are two ways to fix that.
The first is to click on letter spacing and decrease the spacing until you like it. However, sometimes that doesn’t space quite right.
The second way, which is the way I do it, is clicking on the word and click ungroup.

Then you will find each of the letters can be highlighted separately and moved until they where you want them to be. Then you can select them all and hit group.

7. Size and place the mermaid and the name where you want them. Then highlight both and click attach.


8. Since I have three granddaughters, I selected the attached images and clicked duplicate twice.

9. I then changed the names, but everything else stayed the same.


10. Then, I went back into images and clicked on a mermaid image for the other side.

11. I added it and sized it.

12. Then I duplicated it twice. I colored them all green.

13. I clicked make it and it separated it into mats for me. The most important thing to remember is if you have writing and this is an iron on item, you need to click mirror. Otherwise, it will be ironed on backwards.

14. I adhered my glitter iron on vinyl to my mat.

15. I had the machine cut it.

16. Once cut, I pulled off the excess.

17. I preheated the fabric.

18. I placed the iron on to the bag and ironed it, with a towel/cloth between.


19. I then flipped it over and ironed the other side. Be sure to and ironed it.

20. Then I flipped it over and with the tip of my iron, went directly over the plastic.

21. Since I have a grandson as well, I went with a shark theme. I made it all the same way as the mermaid.


Here are the ones for the girls.


22. I made the mistake of having the hot iron hit the straps, which were nylon. So I melted them a little and wanted to cover that up. This part is optional, if you don’t melt your straps!

23. I found coordinating ribbon.

24. I used a combination of hot glue and other glue to wrap a ribbon around the straps.


25. I used clothespins to keep it in place while the glue dried.


That’s it! I hope you like them!


