
Learn how to paint a ghost on a resin coaster in this easy Halloween craft tutorial. Perfect for decor or gifting, this project is fun, quick, and customizable!
Halloween is the perfect time to get creative with your crafts, and today I’m excited to share a fun and easy DIY project—painting a ghost on a resin coaster. This project is a great way to add a spooky yet cute touch to your Halloween decor. Let’s dive in!
If you have followed me for a while, you know I love Halloween and I love making coasters, so this is a double win for me!
How to Paint a Ghost Coaster Materials You’ll Need
For this project, you’ll need the following materials:
*This blog uses affiliate links. As an Amazon Associate I earn from qualifying purchases, at no additional cost to you.
- Fine glitter (black, blue, light blue)
- Thick white glitter
- Black and white acrylic paint
- A rounded paintbrush
- A heat gun
- Resin
- When deciding on which resin to use for your coasters, you need to keep in mind whether you want it just for cold cups or for hot as well.
- If only for cold drinks, you can be flexible and use whatever brand you like:
- If you want it to work for both hot and cold drinks, you need to look for a heat resistant resin, like these:
- FX Poxy ~ According to the manufacturer, this one is heat resistant to 500° F.
- Stone Coat
- When deciding on which resin to use for your coasters, you need to keep in mind whether you want it just for cold cups or for hot as well.
How to Paint a Ghost Resin Coaster Halloween DIY Craft Video Tutorial
Directions on How to Paint a Ghost Coaster
Here are step-by-step instructions on how to make this Halloween DIY craft.
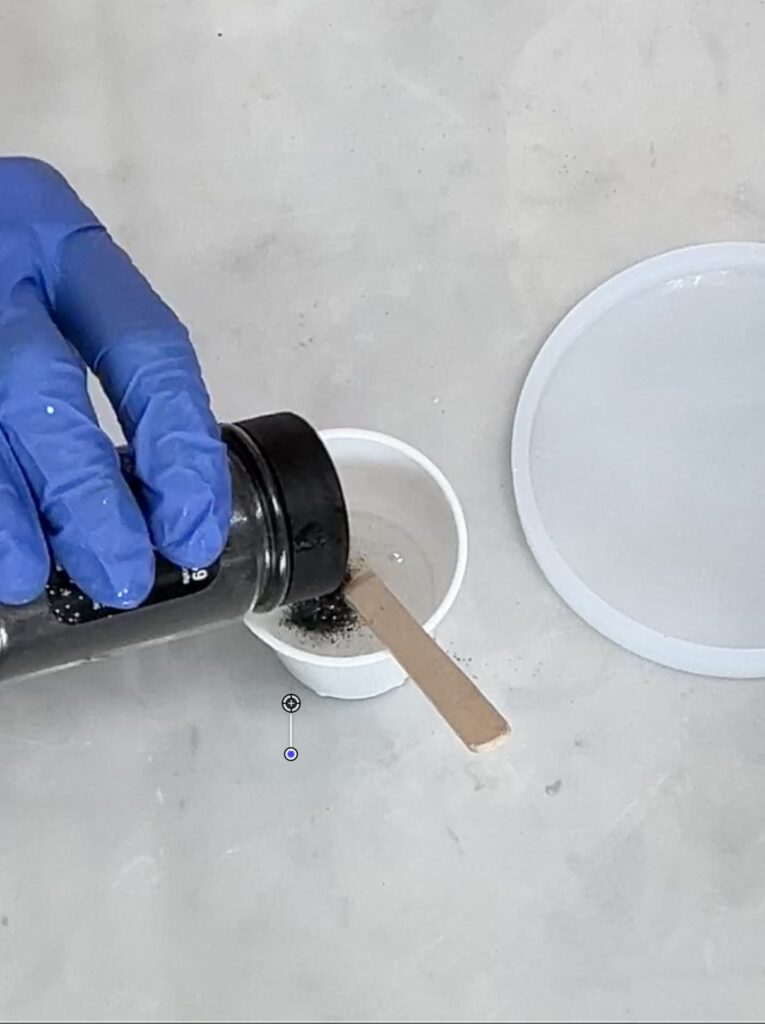
Step 1: Prepare the Resin and Add Glitter
Start by mixing 1 oz of resin. Once the resin is ready, add some very fine black glitter. To give your coaster more dimension, add a bit of blue glitter followed by a lighter blue glitter. Mix it all together to see how it looks. Next, add some thicker white or clear flakes for extra texture. There’s no right or wrong amount to add—just go with what looks good to you.
Step 2: Pour the Resin into the Mold
After mixing your glitter into the resin, pour it into your coaster mold. The beauty of working with resin is that it will naturally blend the glitter together in unique ways, creating a beautiful, one-of-a-kind design. If the resin doesn’t reach the edges of the mold, you can use a stir stick to help it along. Once poured, use a heat gun to pop any bubbles that may have formed.
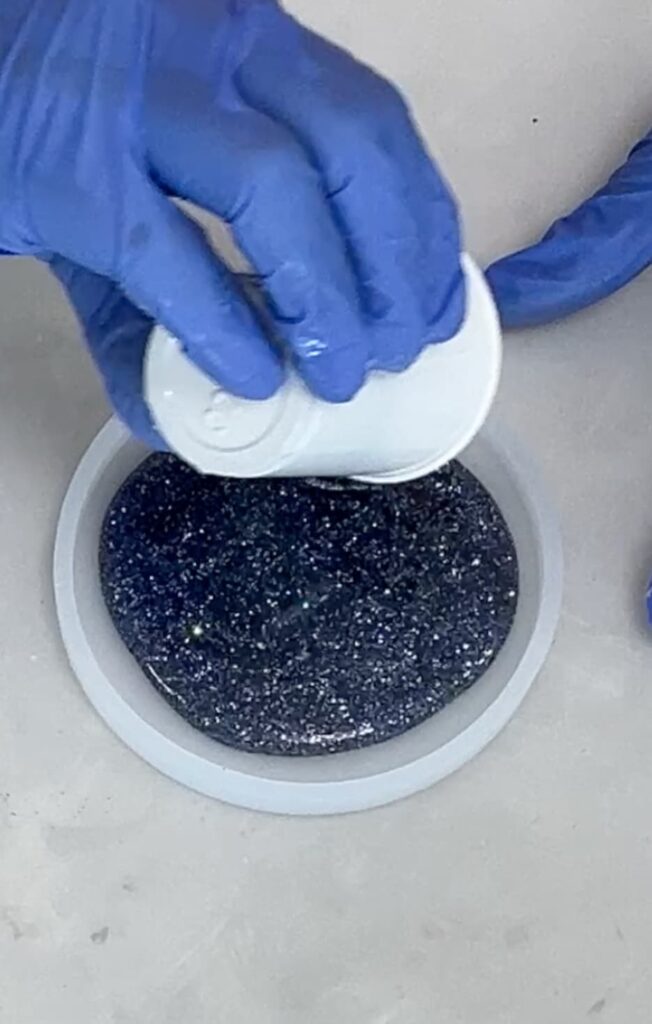
Let it cure for a minimum of 12 hours. Once it is fully cured, you are ready to paint your ghost.
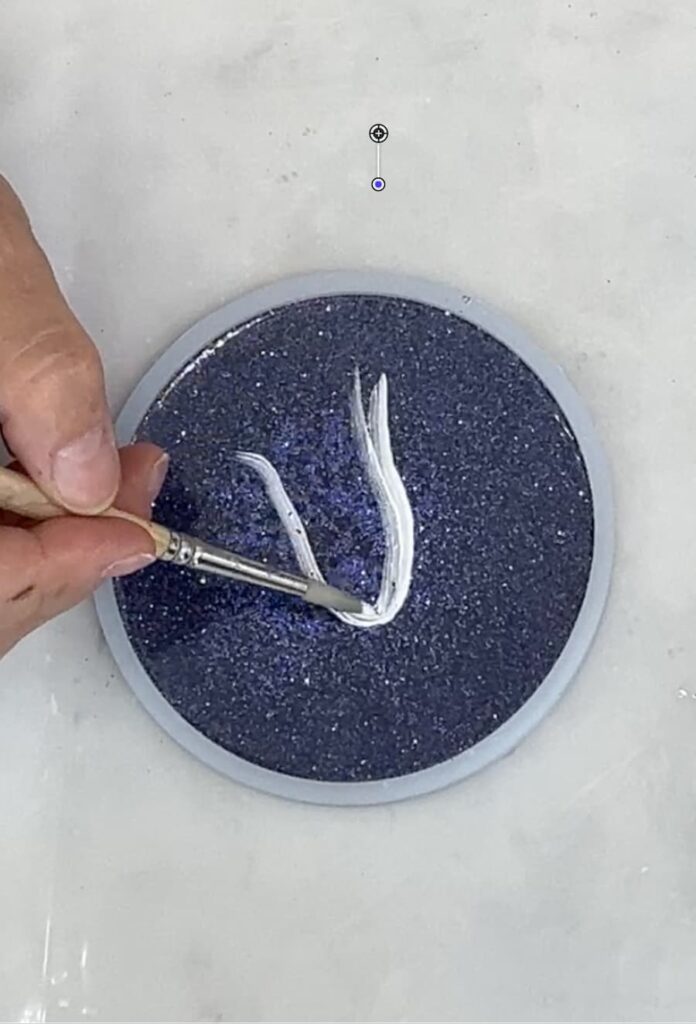
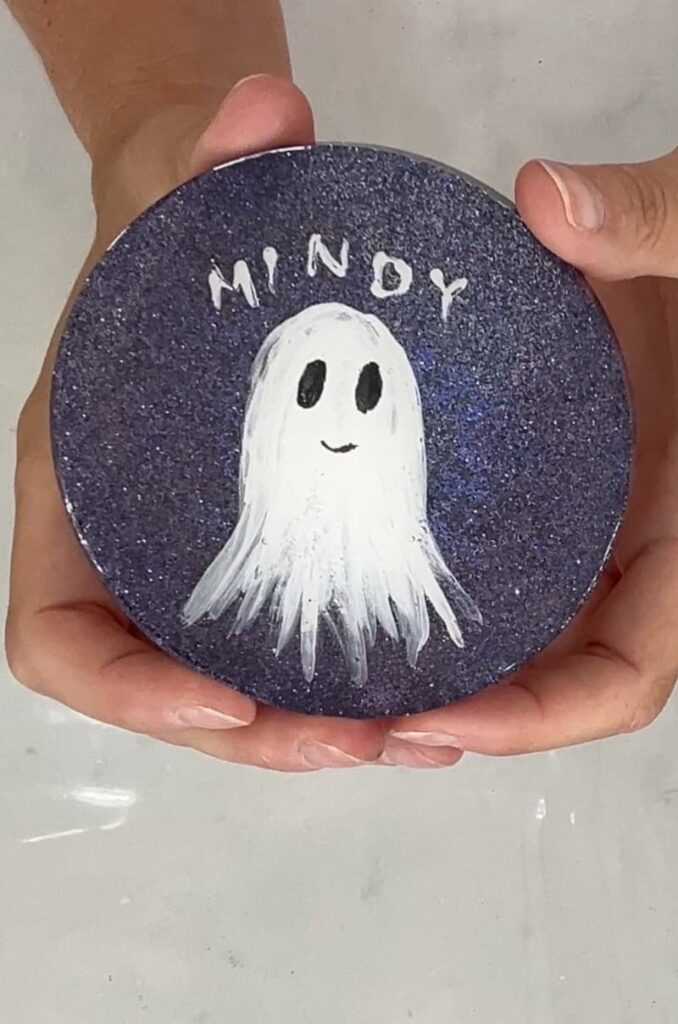
Step 3: How to Paint a Ghost
For this step, I’ll show you how to paint a ghost. You’ll need black and white acrylic paint and a rounded paintbrush. Decide where you want to paint your ghost, and start by applying white paint. Let the paint drift off at the end to create a soft, ghostly look. Don’t worry if there are small imperfections due to the glitter underneath—just paint over them.
Adding the Eyes and Mouth
Once the white paint is dry, use black paint to add a couple of eyes to your ghost.
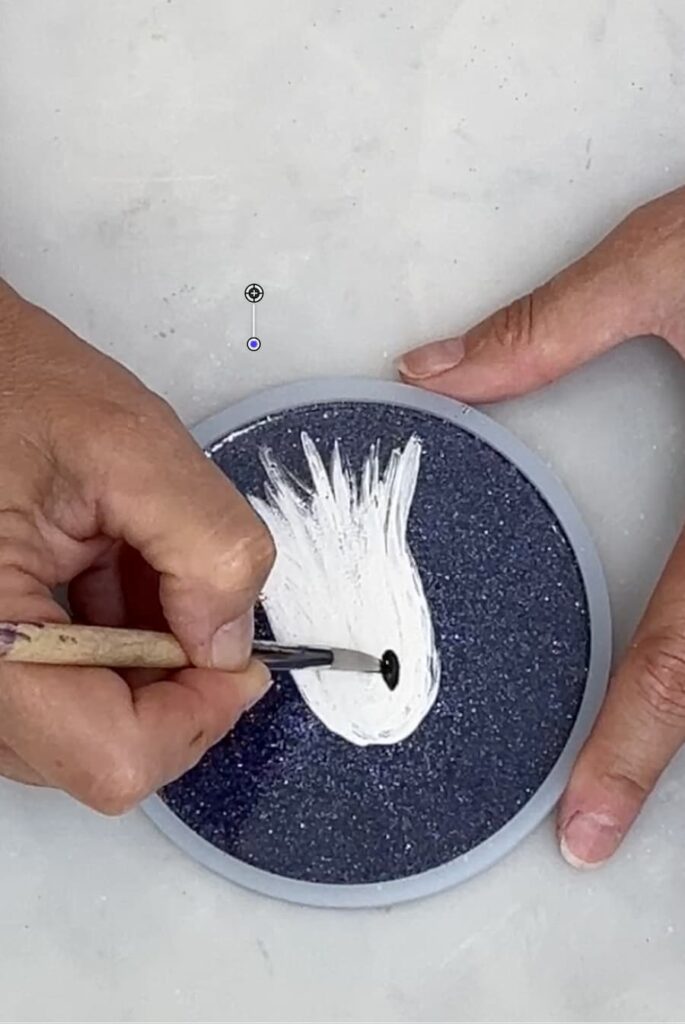
When you are deciding on how to paint a ghost, you get to decide what personality to give it. By adding a mouth—whether it’s smiling, frowning, or screaming is up to you – you can really personalize your ghost.
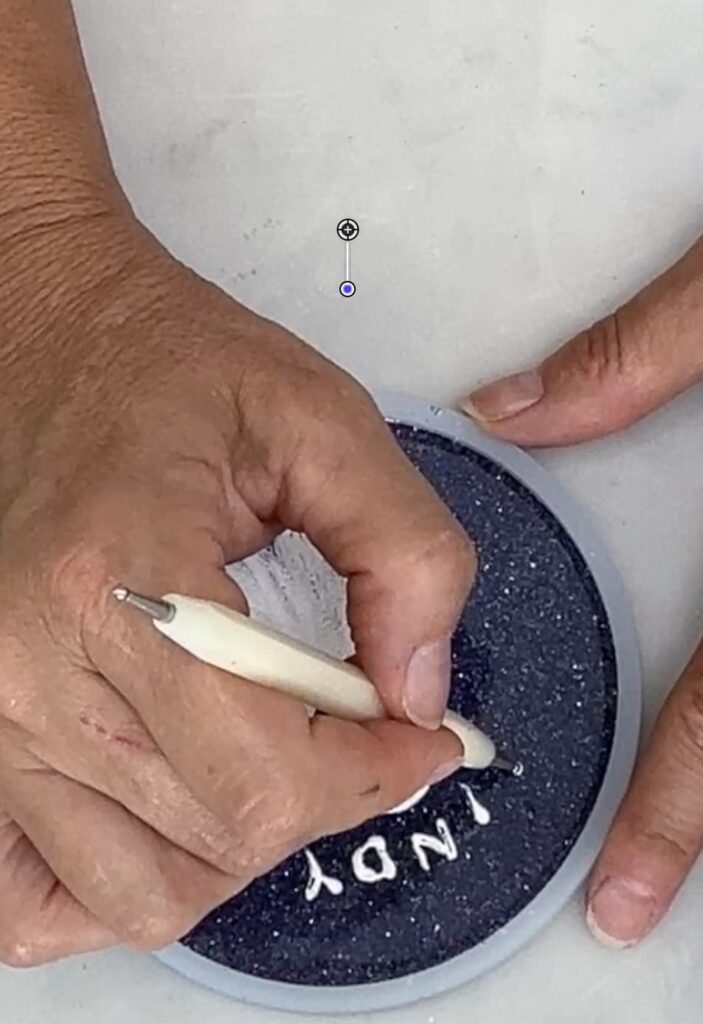
Step 4: Personalizing Your Coaster
If you want to add a personal touch, consider adding a name to your coaster. For this project, I added my niece’s name because she loves ghosts. This step is optional but can make your coaster even more special.
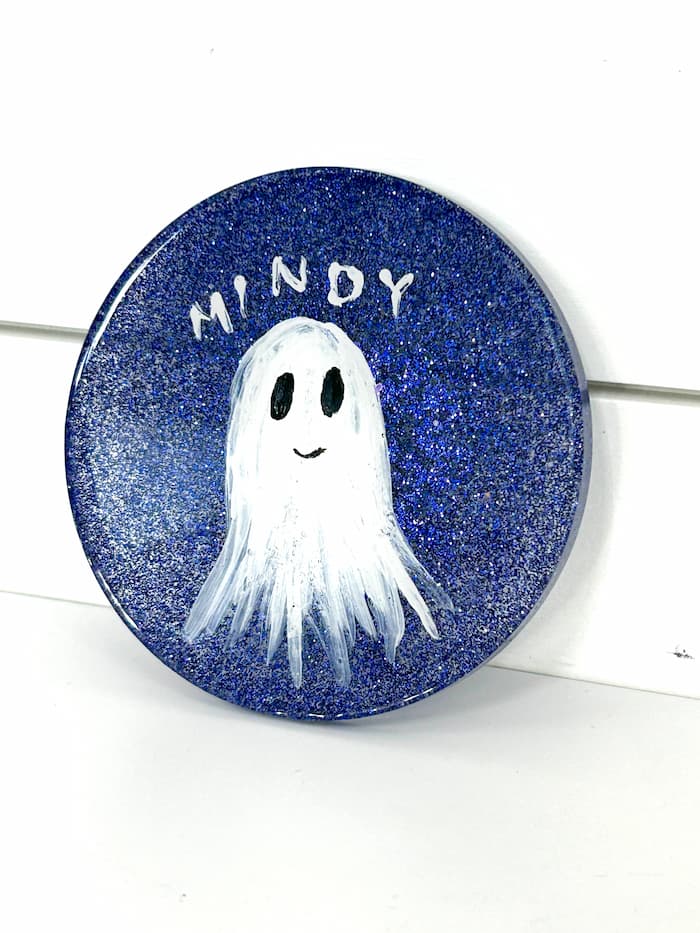
Step 5: Final Resin Layer
Once your paint is completely dry, pour a final layer of resin over the coaster to seal your design. Use your heat gun to pop any bubbles that appear. Let this layer cure fully before removing the coaster from the mold.

Now you know How to Paint a Ghost and you have an amazing resin coaster!
After the final layer of resin has cured, your ghost coaster is ready to use. The slightly translucent effect of the resin adds an extra layer of spookiness, making it perfect for Halloween. You can use it as a coaster, or you could drill a hole in it and turn it into a Halloween ornament.
Share Your Creations!
I’d love to see your versions of this ghost coaster! You can share them in my Facebook group HERE.
Feel free to share and teach someone else how to paint a ghost on a coaster!
Other Halloween DIY Craft Coaster
If you enjoyed this project, check out some of my other coaster tutorials
- Halloween Coaster DIY
- Halloween Bat Craft Coaster DIY
- Creepy Bug Halloween Coasters
- Halloween Witch Decor
So Many Great Ghost Coasters!
If you don’t have time to make a painted ghost coaster, there are so many that can add to your Halloween decor. So many to choose from!

Remember: Life’s too short not to shimmer, so grab your glue gun and your glitter!™
Mona
Such a fun and adorable little project. I can imagine kids will love to help make these too. This post will be a feature this week. Thanks for sharing on the link party. #HomeMattersParty
Thank you so much, Donna!
I’ve not used resin yet, but this looks nice and easy for a first timer. Thanks for joining in with #pocolo and hope to see you back again soon.
It is super easy! You should definitely give it a try!
This is so cute! I like how it can be personalized, too.
Thank you for sharing on the #QuarterlyBookishParty #BloggersConnecting.
My niece ended up loving it. After the fact, I thought I could have just gone with BOO!
Love this Mona!
Thanks’ bunches for sharing with Bookish Bliss, Musings & More Quarterly Link-Up.
Also, hop on over to my Main website https://gracefilledmoments.me
And feel free to link up at my Sweet Tea & Friends (Monthly) link up. It’s open from the 1st through the 21st of each month.
Thanks, Paula!
I love doing crafts, but I have never used resin before. The coaster is so cute, and I love the ghost!
Thank you, Karalee! ❤️ I think you would love resin crafting!