
Create a spooky ghost Halloween decoration with this easy DIY! Learn how to make a ghost craft using resin, a Dollar Tree vase, and glass paint. Perfect for Halloween!
I’m so ready to add a spooky touch to our home this Halloween!
Are you?
This is the perfect ghost Halloween decoration! It’s an easy ghost craft that takes a basic and inexpensive Dollar Tree vase and turns it into a fun and eerie centerpiece. With resin spooky ghosts and a pop of color, this project will make your Halloween decor stand out!
First, a Little Confession…
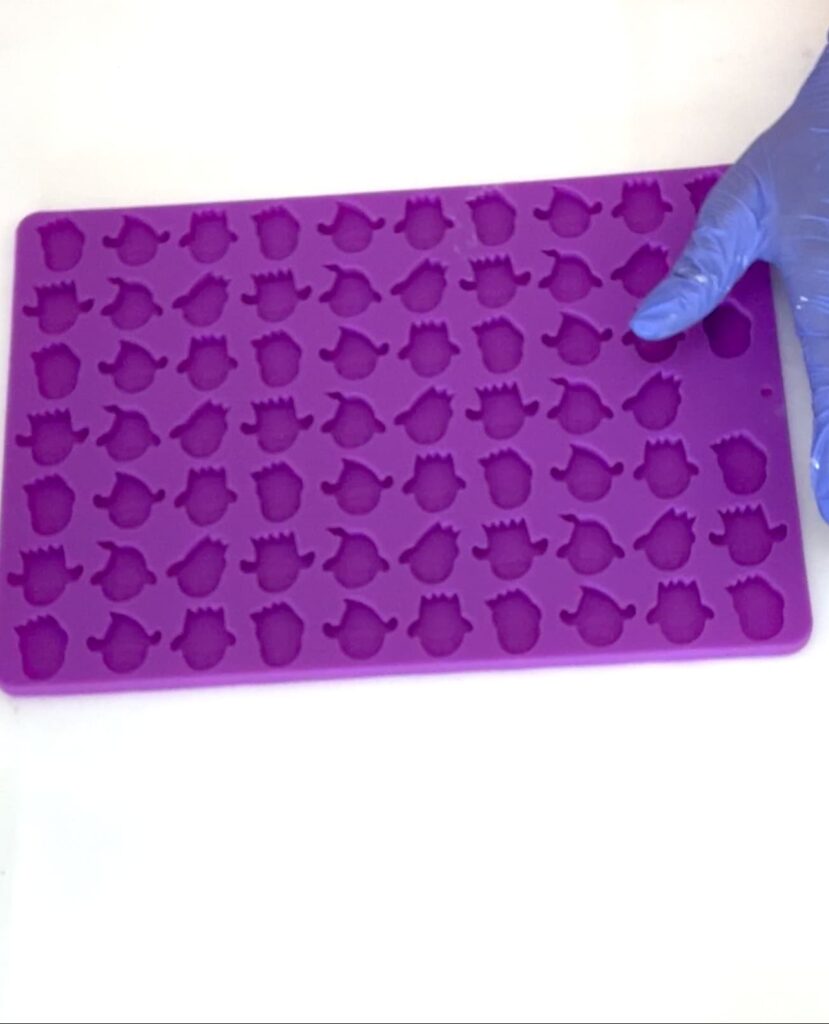
I’ll admit it – I’m a bit of a resin mold hoarder. Whenever I see a cute or unique mold…especially around Halloween…I have an inner battle about whether I should get it or not. I try to do the right thing, but I lost the battle this time. When I came across this adorable ghost mold, OF COURSE, I had to add it to my collection.
Thankfully, Greg has no idea just how many molds I have because I have them stashed in my craft shed. My craft shed is the land of glitter and glue, which is a natural repellent for him, so he stays as far away as he can!
Full Video of the Spooky Ghost Halloween Tutorial
If you want to see exactly how I put the ghost craft together, you can catch it in the video.
Materials You’ll Need:
*Disclosure: This blog uses affiliate links from Amazon and other retailers. I earn a small amount from qualifying purchases at no additional cost to you.
- Silicone ghost mold (with small ghost shapes)
- White opaque pigment
- Toothpick
- Heat gun (or lighter)
- Fine-tipped permanent black marker
- Dollar Tree cylinder vase
- Rubbing alcohol
- Adhesive for plastic and glass
- Murano Glass Paint in Violet
- Alternative Glass Paint
- Fairy lights
- Halloween or fall flowers
- Resin:
- When deciding on which resin to use, there are a lot of qualities that might be appealing, UV resistant, price, heat resistance, etc. Just make sure to select a resin that fits your needs.
- Use whatever brand you like:
- Easy Cast
- Art Resin
- Let’s Resin
- Promise Epoxy
- These are heat resistant resins:
- FX Poxy
- Stone Coat
Directions:
Step 1: Create Your Resin Ghosts
Time to break out the silicone ghost mold!
To start your ghost Halloween decoration, use the silicone mold with small ghost shapes. I happened to have some resin leftover from another project and mixed some white opaque pigment into the resin. I would start with one ounce and see how far it gets you.
Carefully pour the resin into the ghost mold cavities, ensuring the resin reaches the edges. Use a toothpick to push the resin into smaller areas if needed.
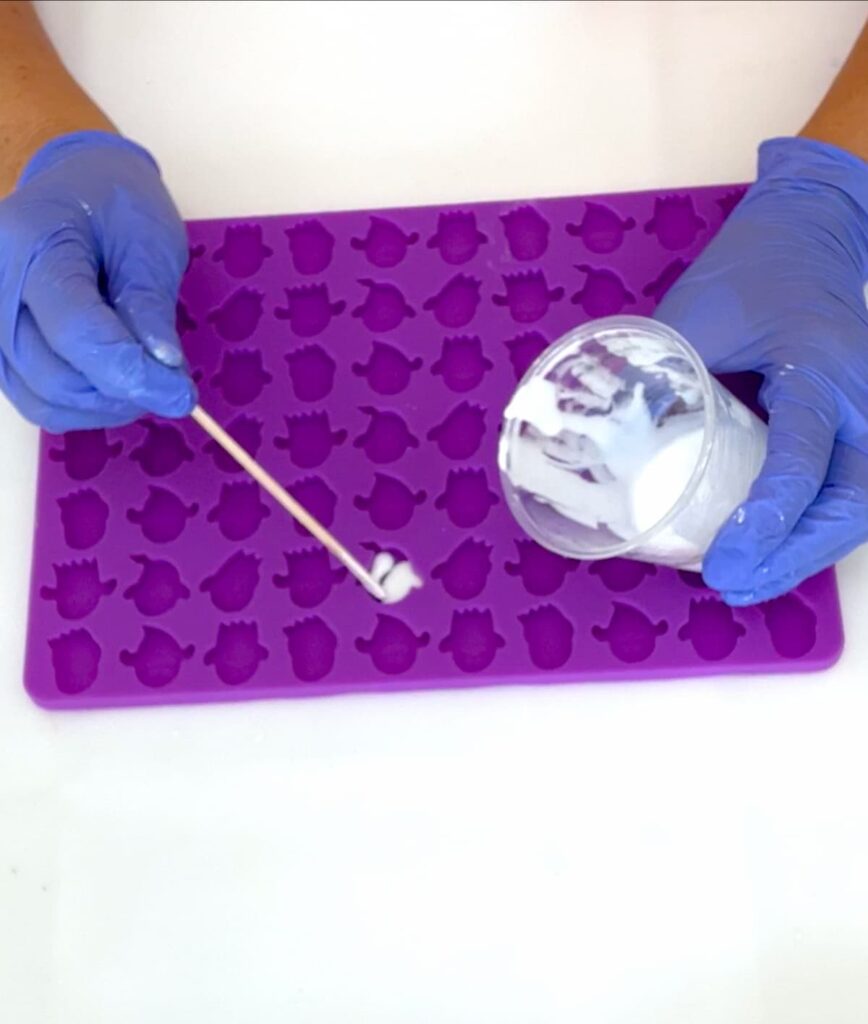
*You DO NOT need to fully fill the cavities! You just need a thin layer so the surface is completely covered.
Pop any bubbles using a heat gun or lighter, then let the resin cure for at least 12 hours. Once set, remove the ghosts from the mold and prepare for the next step.
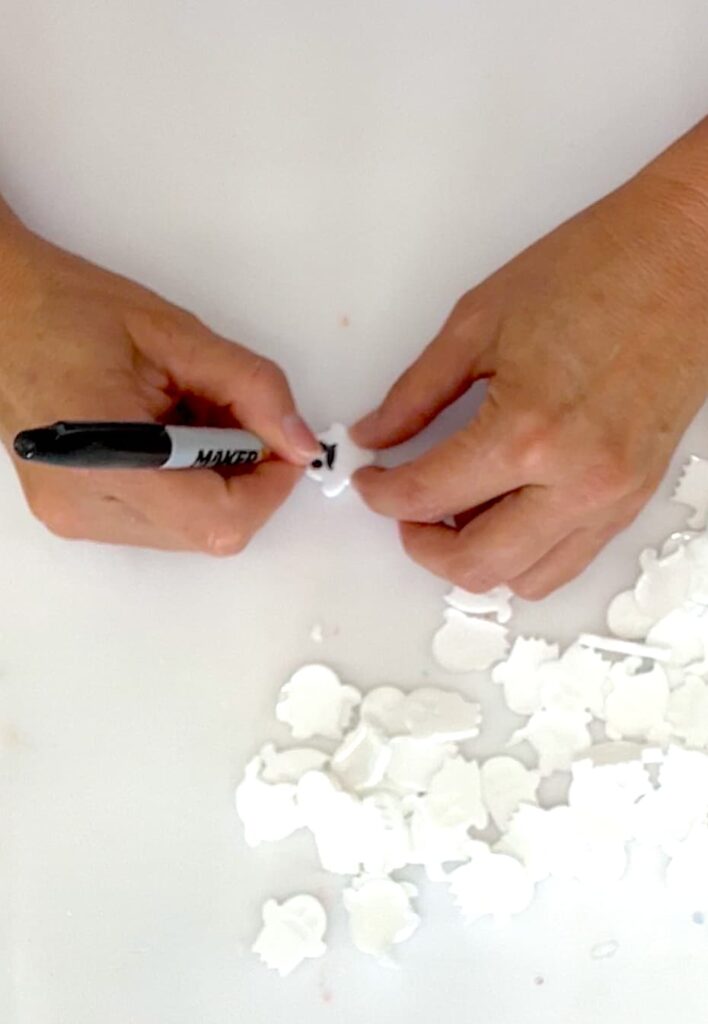
Step 2: Add Spooky Ghost Faces
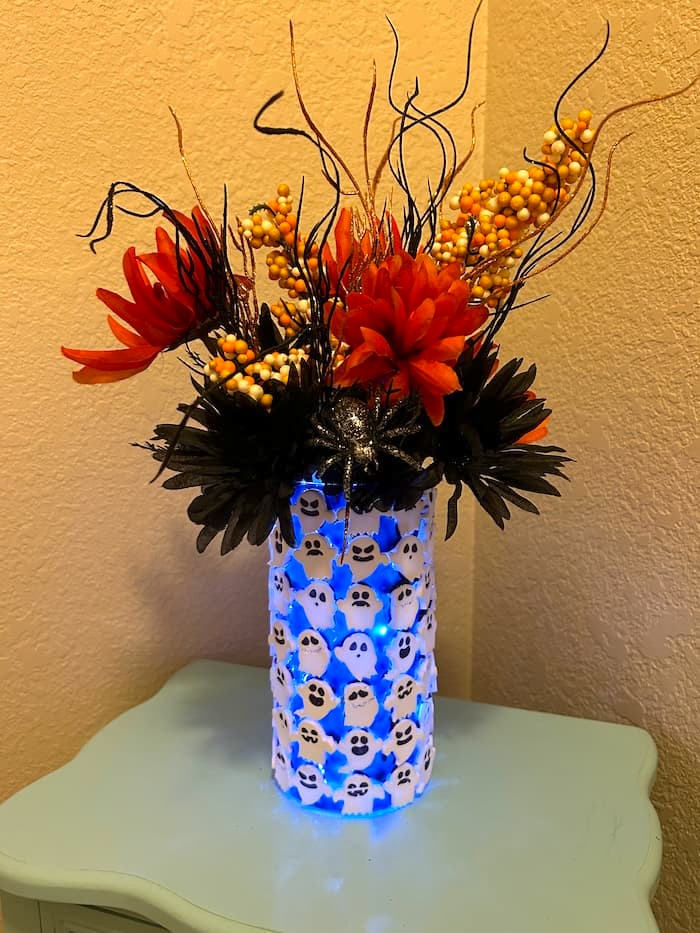
The spooky ghosts aren’t so spooky when you pop them out of the mold. It’s time to let their personalities shine through by using a fine-tipped black marker, color in the simple faces on each ghost—eyes and a mouth are all it takes to turn them into fun ghost decorations.
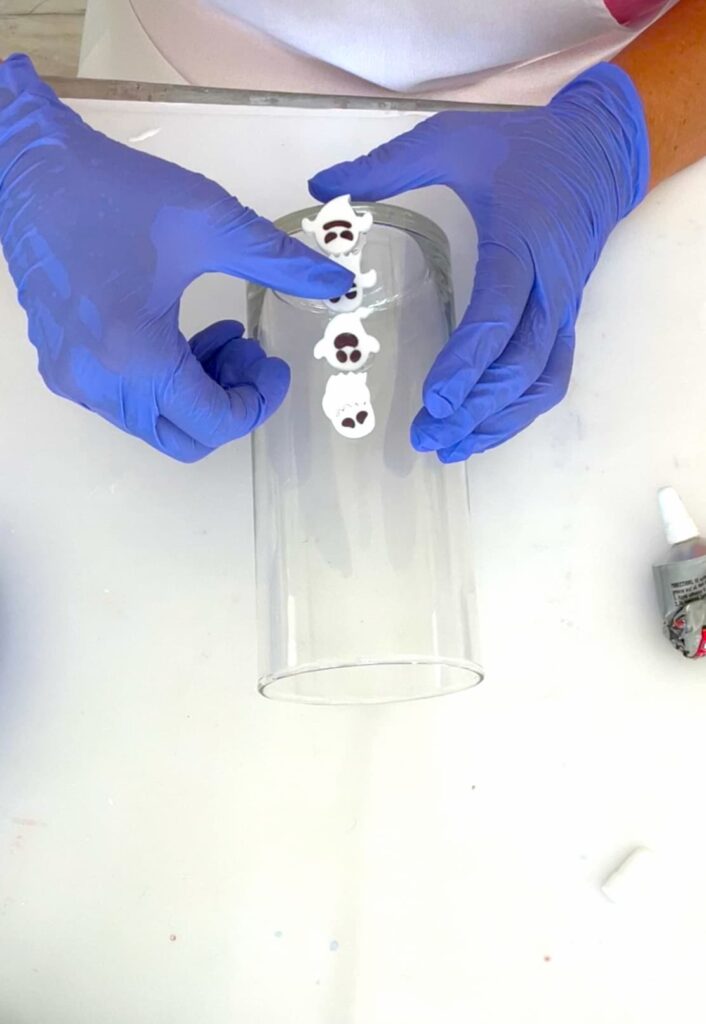
Step 3: Prepare the Vase and Attach the Ghosts
Take your Dollar Tree cylinder vase—they are so fun to decorate and perfect for this ghost craft! Before you start decorating, you want to clean the vase thoroughly with rubbing alcohol to remove any fingerprints or oils. This will ensure the ghosts stick to the surface properly.
(And don’t forget, if you missed my tutorial on turning this same vase into a Frankenstein Halloween decoration, be sure to check it out here.)
Apply adhesive to the back of each resin ghost. Working one column at a time, attach the ghosts to the vase. Lay the vase on its side to prevent the ghosts from sliding before the adhesive dries.
This can take a little time. If you are impatient, you can use some painter’s tape to hold the ghosts in place while the glue dries and you work on another section. Continue this process until the vase is covered with your little ghostly figures.
Step 4: Enhance the Look with Glass Paint
After attaching the ghosts, I felt like the project needed an extra touch. I reached out to my niece and my sister to see what they thought. They too thought it needed a little something extra.
My initial thought…as it always is…is GLITTER but I had to reign in my sparkly enthusiasm and wanted to consider an alternative when I thought…glass paint!
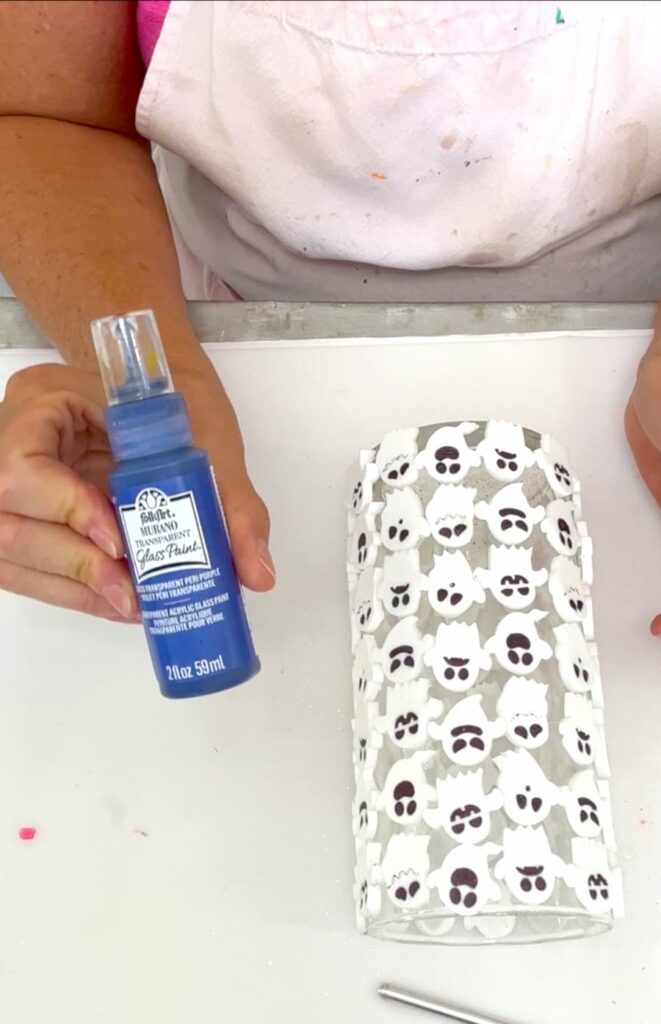
We decided that adding color using glass paint might be really cool! Then, I went about the task of adding the paint between each ghost. Now, the spooky ghosts have a stunning, finished look.
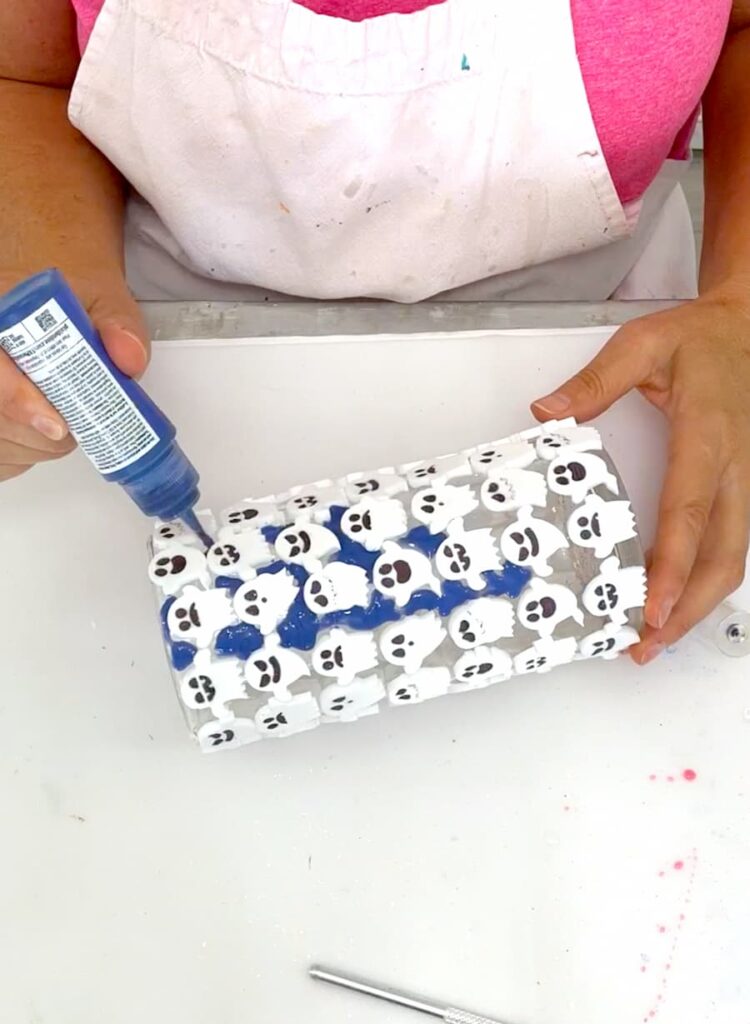
This step is easy because the paint doesn’t run. You can apply it while the vase is upright without worrying about drips.
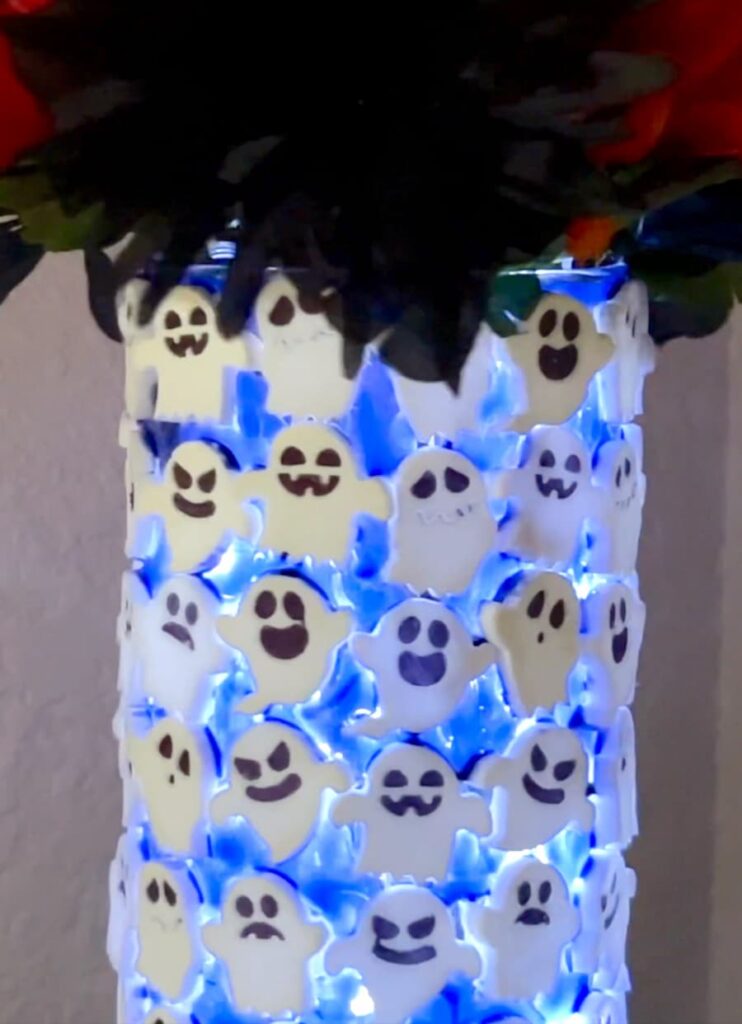
Step 5: Add Fairy Lights and Flowers
Once the paint dried, I added fairy lights inside the vase to give it a ghostly glow.
Okay…maybe it’s not a ghostly glow but everything is cooler when it glows.
The soft glow brought the whole project to life! To complete the look, I added some fall and Halloween flowers to the top of the vase.
I bought mine at Dollar Tree and I especially like the ones that have glittery spiders already incoporated. That saved me a step!
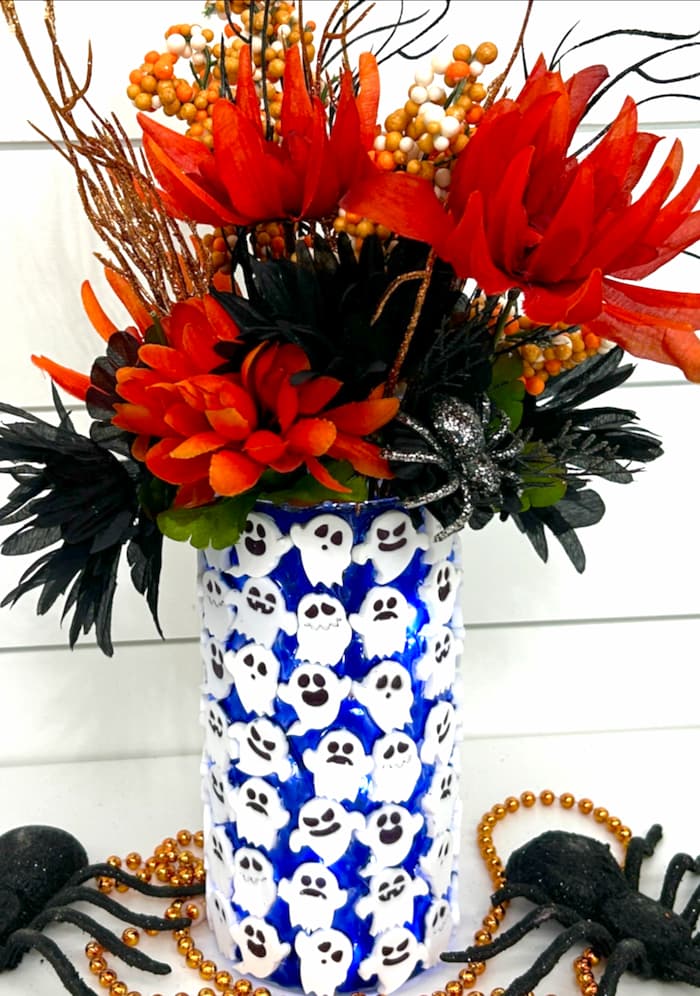
With the addition of the fairy lights and flowers, this ghost DIY turned into a beautiful and spooky centerpiece for Halloween!
This ghost craft is an easy way to create a spooky ghost vase perfect for any Halloween setting. Whether it’s for a party, centerpiece, or mantel decor, this ghost Halloween decoration adds a haunted flair to your home. You can customize it with different colors and ghost expressions to make it your own. If you’re wondering how to make a ghost vase that stands out, this tutorial will guide you through it step by step.
More Spooky Ghost Halloween Inspiration
Looking for more ghost craft ideas? Check out these fun projects:
- How to Paint a Ghost on a Resin Coaster | Halloween DIY Craft
- Cheese Cloth Ghost Craft Tutorial
- Easy Ghost Craft Coasters
- Halloween Coaster DIY | Cricut Crafts
Ghost Decorations
If you love a good ghost decoration, you are going to love these!
Happy Halloween and remember: Life’s too short not to shimmer, so grab your glue gun and your glitter!™
Stay safe!
Mona
Ghost vase is cute. I would have coated the inside of the vase with the purple glass paint instead of around each ghost- mainly cut I don’t have the patience you do:) Another great project from Mona!