To stay up on the latest, be sure to
SUBSCRIBE to my YouTube Channel!
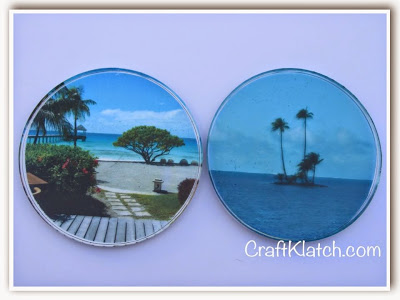
I wanted to try preserving some pictures for a fun coaster and a unique way to display your vacation photos!

You will need:
– Coaster mold
– Resin – I used Easy Cast, but Envirotex Lite would work too!
– Transparency film for laser printers
– Laser printer (you can go to a Kinkos or office supply store and they may be able to print them for you).
– Scissors
Here are some items available through Amazon, incase you want to give it a try:
Here is the video tutorial:
https://youtu.be/Bvo3shpl97s
Directions:
- I started with vacation pictures and printed them on a transparency film using a laser printer. Try not to touch the images, you don’t want to get finger prints on them.
- I cut them into circles using a circle cutter, but you could trace a circle and cut it with scissors. The circle cutter didn’t cut all the way through, I had to follow up with scissors. I cut them just smaller than the mold cavity.
- I prepared my resin. I used Easy Cast, but Envirotex Lite would work too.
- I poured it into the molds. I prepared 3 ounces of resin total.
- Once the resin is in the mold, I gave it a minute or two before using a lighter to pop the bubbles.
- Then, I carefully slid the pictures into the resin.
- Using my stir stick, I pressed them down, making sure I press all the bubbles out from under the pictures.
- I again popped bubbles.
- Then, it’s time to let them cure, a minimum of 12 hours before unmolding.
That’s it! Thanks for stopping by! Happy Crafting and stay safe!
Mona
Mona

Your picture coasters is a really neat idea…….and great conversation piece also. Thank you for sharing with the Clever Chicks Blog Hop! I hope you’ll join us again next week!
Cheers,
Kathy Shea Mormino
The Chicken Chick
The-Chicken-Chick.com
I love all the coaster ideas! I am wondering if there would be a way to insert a loop of some sort during the curing process to make an ornament out of it??