To stay up on the latest, be sure to
SUBSCRIBE to my YouTube Channel!
You can click right HERE!
For easy reference, click on the Tutorials tab above.
Also, I created an Amazon store link, with items that I use in my crafts, just click on the
Products I Use above!
Products I Use above!
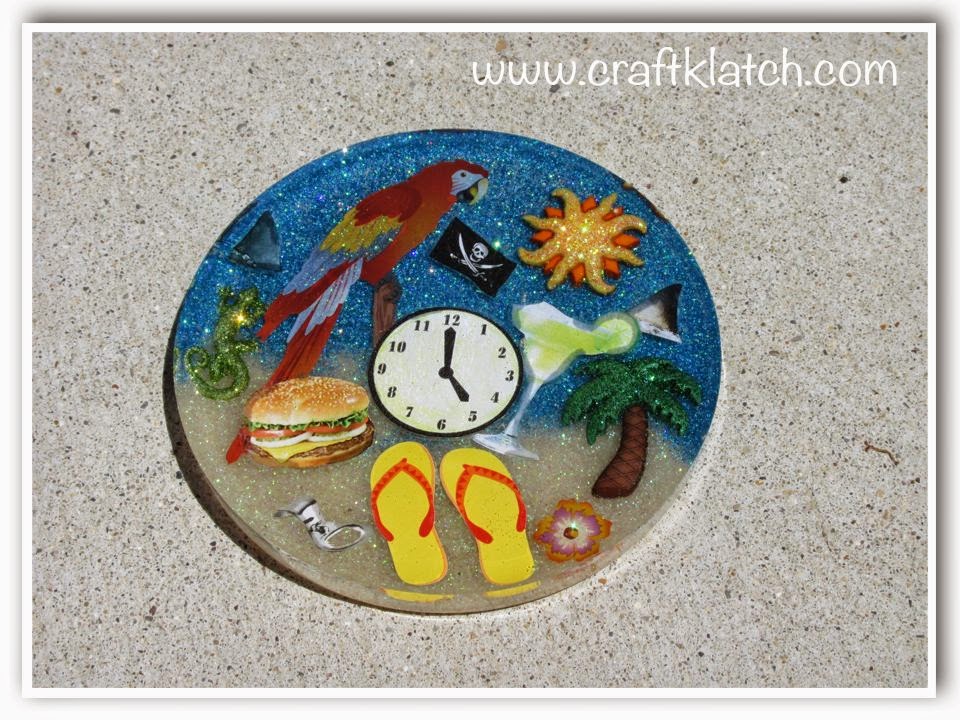
Summer is finally here and what says summer more than Jimmy Buffet? This coaster was inspired by Jimmy Buffet and his awesome music. For those of you who may not know who Jimmy Buffet is, look his music up and you are sure to know a tune or two!

You will need:
– Coaster mold
– Resin (I used Easy Cast – for more info. go to www.eti-usa.com)
– Stickers
– Packing tape
– Pictures
– Buttons
– Glitter
– Sand
– Sand
– Clear drying glue, or clear glue dots
Here is the video tutorial:
Directions:
1. Prepare resin, according to the package directions, and split into two cups. You only need enough to cover the bottom of the mold. Add blue glitter into one of the cups and stir.
2. Add sand into the other cup, along with white glitter. The sand will take on a darker, wet sand look. By adding the white glitter, it lightens up the sand.
3. Pour the sand resin into one half of the mold. Pour the blue glitter resin into the other. They will mix and blend together. This creates the background.
4. After about an hour, I added the tropical buttons – palm tree, sun and salamander. Before adding them, I snipped the back part off, where you would sew and attach the button. That way, they will lie flat.
5. Allow to cure. I would give it 12 hours.
6. Now it’s time to add your stickers and other embellishments. When I was originally planning on doing this coaster, I looked everywhere for stickers that would work. I found some, but not others. Some were pretty specific and I knew I would never find them, so I had to figure out an alternative. I remember one of my viewers telling me about putting packing tape on paper, or paper stickers, to seal it, so the resin wouldn’t seep through the leave dark marks. So, I got on the computer, found pictures that worked, sized them, printed them and sealed them in packing tape. You cut out the picture, stick it onto the packing tape and take another piece to sandwich it in between. Make sure you rub it real good, with a fingernail, bone folder, something, to ensure you have a good seal. Trim it again, but leave a small clear border around the piece because that is where the seal is. I did that with the clock, pop top, the margarita (that one I did not seal well enough), cheeseburger, the pirate flag and the fins.
For reference, I use them for the following:
Margarita for Margaritaville
Cheeseburger for Cheeseburger in Paradise
Pirate flag for A Pirate Looks at Forty
Clock that reads five o’clock for It’s Five O’Clock Somewhere
Shark fins for Fins
Flip flops and pop top for lyrics in Margaritaville, where he blew out his flip flop, on a pop top
Parrot for his followers being called Parrotheads
The remaining items were used just for the whole tropical feel.
7. Affix the stickers and pictures to the resin by used either a clear drying glue – which MUST be COMPLETELY dry before you pour your next layer of resin, or it will remain forever white. I used clear glue dots to affix my pictures. They worked great!
8. Prepare more resin and pour it right over everything.
9. Run the lighter over the resin, to pop any bubbles and let it sit for a minimum of 12 hours before unmolding!
That’s it! I think it’s the perfect coaster to hold my margarita!!
Do you have a favorite Jimmy Buffet song? If so, what is it? Leave it in the comments below! Thanks for stopping by, Happy Crafting and beware pop tops and tourists covered in oil!
Mona
