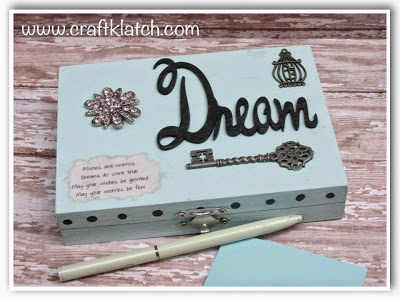
Have you ever heard of a worry doll? They are little, tiny handmade dolls. You are supposed to tell your worries to the dolls before bed and then place them under your pillow. I’m not sure if they are supposed to alleviate your worries, or fix your problems, but I like the concept either way. I think they are Guatemalan, but I could be wrong.
A friend of mine brought some back to me from Egypt. When my nephew was little, he was a thinker and worrier. I had him use the worry dolls and they seemed to help. I wanted to create a fun and easy craft that plays off of the same basic idea. It can be made for a kid, a grown up, a best friend, someone going away to college, the possibilities are endless!

You will need:
– A box
– Acrylic paint (I used a light blue, purple and black)
– Mod Podge
– Paper with no bleed ink – I used a laser printer, but you could use a copy machine (inkjet won’t work)
– Satin varnish
– Unfinished wood letters to spell out what you want. I used a precut DREAM piece.
– Rub and Buff silver
– Various embellishments – I used a key, metal birdcage, costume jewelry pin
Here are some fun embellishments, available through Amazon, which might work:
Here is the video tutorial:
Directions:
1. Remove the hardware from the box.
2. Paint box. I did the inside purple and the outside a light blue. It will take at least two coats.
3. Paint your letters black. Allow to dry.
4. In the mean time, you can print out the poem for the front and the two other items for the inside.
They are as follows:
2. Paint box. I did the inside purple and the outside a light blue. It will take at least two coats.
3. Paint your letters black. Allow to dry.
4. In the mean time, you can print out the poem for the front and the two other items for the inside.
They are as follows:
Wishes and worries
Dreams do come true
May your wishes be granted
May your worries be few
Right before bed, put your worries
on this side. May your worries
be lifted and replaced with
peace and sweet dreams.
Put your wishes and dreams
on this side. Each day you
come closer to your wishes
and dreams coming true.
Or personalize it with your own words!
5. I used a laser printer, so I didn’t have to worry about the ink running when it got wet. You can use a laser printer, or a copy machine, but inkjet ink won’t work.
6. Fold the paper maybe a half an inch from the words. Wet your finger and run it along the crease. Tear the paper along the fold. The water will help give it a rougher edge. You can pick little pieces off to make the edge even rougher. Crumple it and then straighten it out.
7. Take a little coffee on a paint brush and brush the coffee on the paper. Use a paper towel to gently blot it off.
8. Use the back of your paint brush and make black dots along the side of the lid.
9. Place all your items on the lid and see where you want them. Once you like what you have, Mod Podge the poem to the front. Mod Podge the other two items to the inside of the box.
10. Allow everything to dry. Then take the satin varnish and varnish the entire box at least twice.
11. Allow to dry and then glue on all your embellishments. Again, allow to dry.
12. While the hardware is off and if you want to turn it silver, use Rub and Buff wax. Put it on the hardware, let it dry and buff it.
13. Reattach hardware.
That’s it! Now you have a cool home decor item, or gift! Make it your own or personalize it for the recipient. Go traditional, or neutral or off the wall CRAZY!
Thanks for stopping by and Happy Crafting!
Mona

This is beautiful, Mona! Such a great idea!
This is my favorite, I love this project! I would love to win this beautiful dream box.
What a gorgeous little box and super fun project!
Found you over at Clever Chicks Blog Hop