SUBSCRIBE to my YouTube Channel!
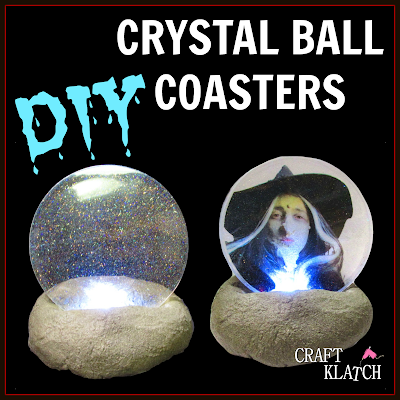
Today we are making crystal ball coasters, for a little Halloween craft project.

You will need:
Coaster mold: https://amzn.to/2dTol7c
Resin: https://amzn.to/2dTnEuI
Glamour dust: https://amzn.to/2e3paNG
Transparency film: https://amzn.to/2dTnzqQ
Shapecrete: https://amzn.to/2dwk5LJ
Here is the video tutorial:
Directions:
1. Print out an image, I used a witch image, on transparency film and cut out.
2. Mix two ounces of resin, according to the package directions.
3. Mix in a little Glamour Dust, or super fine glitter.
4. Pour into two of the coaster mold cavities.
5. Use a lighter to pop the bubbles.
6. On the other, slide in the image and press it down with the stir stick. Make sure the bubbles are pressed out from under the image. Use lighter to pop the bubbles.
7. Allow to cure a minimum of 12 hours.
8. Remove from mold and work on parchment paper, or a silicone mat. Make sure the coasters are level.
9. Mix more resin – one ounce might do it. Add a little more super fine glitter and slowly pour onto the coasters. You need to do this slowly, so it doesn’t overflow the sides.
10. Pop bubbles and allow to cure a minimum of 12 hours.
11. Cover the coasters in plastic wrap. Cover two LED party lights in plastic wrap.
12. Working on aluminum foil, mix concrete, or cement, according to the package directions. When you have the consistency where you can shape, or mold it, create a ball. Make sure it is deep enough to embed the light, without sticking out.
13. Press the light into the cement. Then press the coaster into the cement. (Best to watch the above video for this).
14. Allow to cure overnight.
15. Remove the coaster and the light. I could not get my light out, so in the video I showed how I ended up making it removable.
16. When the base is dry, you can paint it any color you like, or leave it natural.
17. Then add the coasters and the turn on the light, you have a fun an spooky coaster display and Halloween decoration!!
Check out the witch make up tutorial:
Thank you for stopping by! Happy Halloween!
Remember: Life’s too short not to shimmer, so grab your glue gun and your glitter! Stay safe!
Mona

What a fun idea! It would be great to have you share it at the DIY party!
pleasuresofthenw.com/do-it-yourself-link-party-26-diy/