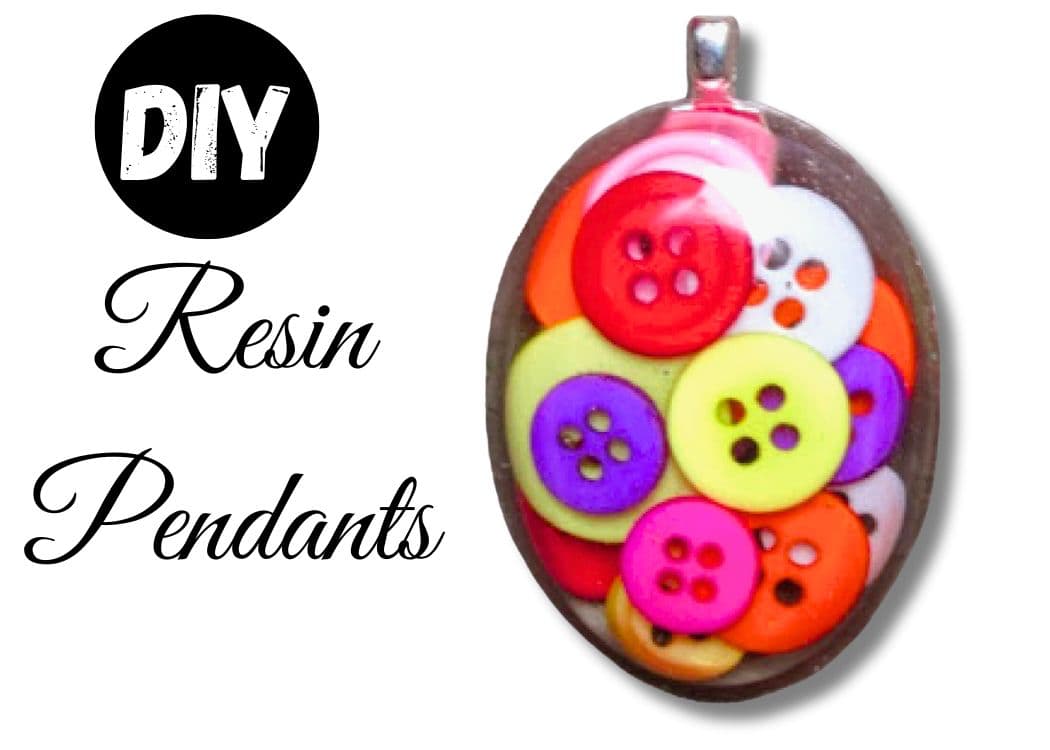
Have you ever wondered if you can use buttons for jewelry making? I made these easy charms and I’ll show you how you can make them too!
One of my subscribers sent me a picture of a button pendant that she saw. She had the picture but there were no directions. She asked if I could make one…
So, I made three!
My FREE Guide!
If you are new to resin or if you just want to check it out, you can grab my free guide for getting started with resin. You can find it HERE! It’s totally free!
Materials You Will Need
*Disclosure: This blog uses affiliate links from Amazon and other retailers. I earn a small amount from qualifying purchases at no additional cost to you.
- Resin:
- When deciding on which resin to use, there are a lot of qualities that might be appealing, UV resistant, price, heat resistance, etc. Just make sure to select a resin that fits your needs.
- Use whatever brand you like:
- Easy Cast
- Art Resin
- Let’s Resin
- Promise Epoxy
- These are heat resistant resins:
- FX Poxy
- Stone Coat
Using Buttons for Jewelry Making Video Tutorial
If you want to see me using buttons for jewelry making for these resin charms, check it out below. It’s so fun and so easy!
Directions on How to Use Buttons for Jewelry Making
Step 1
Prepare your resin according to the package directions and pour a little bit into the pendant mold.

Step 2
Add the buttons for jewelry making and use a stir stick to help press the buttons down. Take a lighter and pop the bubbles. Let it cure for a while.

Step 3
Mix more resin and add it to the mold. Sprinkle glitter onto the wet resin in the mold. The glittered resin will serve as the background for the buttons once the charms are unmolded.
*If I were to do it again today, I would just mix the glitter in with the resin and pour it into the mold for the background.

Allow them to cure for a minimum of 12 hours before removing them from the molds.

That’s it! You can glue on a jewelry bail and now you have an awesome charm!
The great thing about using glitter is it comes in so many textures (fine to chunky) and colors (all colors of the rainbow), that you can make beautiful backgrounds.
You might also consider using pigment powder as a background. Many of the pigment powders have a color-shifting quality that is also quite beautiful!

The other pendant was made by putting resin into a mold and adding layers of buttons. It was inspired by a pendant from Katherine Swift’s book. You can find her book on Amazon.
If you have a bunch of buttons, as I do, you’ll need a place to store them! Check out How To Repurpose Candle Jars, where I turn them into stylish craft room storage!
More Button Crafts!
Here are a few other button crafts that I know you will love! I did stick one where I’m using buttons for jewelry making in there, as a pendant.
- Button Coaster
- How To Make A Button Snowflake Holiday Decoration
- Christmas Tree Button Coaster DIY | Another Coaster Friday
- Resin Button Pendant (a totally different look from this project!)
Thank you so much for stopping by! I hope you give it a try!
Be sure to follow me on Instagram!
Remember: Life’s too short not to shimmer, so grab your glue gun and your glitter!™ Stay safe!
Mona