To stay up on the latest, be sure to
SUBSCRIBE to my YouTube Channel!
It’s time for Thanksgiving coasters!

You will need:
– Felt (red, orange, yellow, 2 browns, white and black)
– Resin (I used Easy Cast)
Here is the video tutorial:
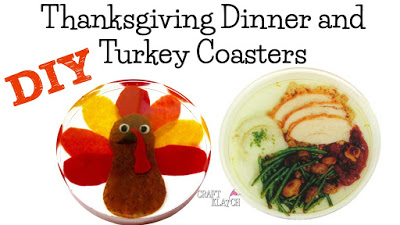
With Thanksgiving right around the corner I did two coasters.
Let’s start with the turkey. I have been asked to add fabric to coasters, so I thought I would kill two birds with one stone (ha ha).
- Cut felt into petal shapes. I used red, rusty orange and yellow. This is for the turkey feathers.
- I mixed two ounces or resin and used the Easy Cast.
- Pour the resin into the mold and place the feathers into the resin, pressing them down with the stir stick and making sure they are covered.
- Pop bubbles with a lighter and allow to cure.
- Cut brown felt into a peanut shape and cut a waddle two eyes.
- Mix more resin (2 ounces) and pour into the mold. I tried using a flesh color for the body, but when I added it to the resin, it became transparent. I had to quick switch to brown. Press all of the felt into the resin.
- Pop bubbles and allow to cure.
- If the resin isn’t flat, after it has cured, add a little more resin on top to level it off.
- Allow to cure.
- Once cured unmold them.
Thanksgiving Dinner Coaster
- Mix one ounce of resin and mix white pigment into it.
- Pour into mold.
- Pop bubbles and allow to cure.
- Print Thanksgiving dinner on transparency film.
- Mix another ounce of resin.
- Pour into the mold.
- Slide the transparency film into the mold and press down with your stir stick. Make sure to press out all the bubbles from underneath.
- Pop bubbles and allow to cure.
That’s it! Unmold them and you have two great holiday coasters!
Thanks for stopping by! Stay safe and Happy Crafting!
Mona
