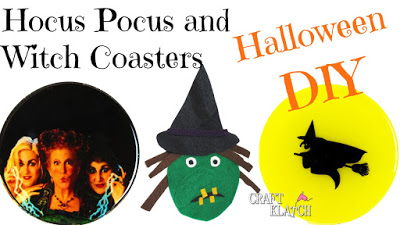
Some of the easiest Halloween witch decor are resin coasters! I did a Hocus Pocus coaster, as well as a witch silhouette…
…AND an easy felt coaster
Halloween Witch Decor Video Tutorial
I’ll run through all three, but here is the video tutorial!
Hocus Pocus Coaster
Hocus Pocus is the perfect theme for Halloween witch decor!
Supplies for the Hocus Pocus Coaster
*This blog uses affiliate links. As an Amazon Associate I earn from qualifying purchases, at no additional cost to you.
- Coaster mold
- Transparency film
- Black resin pigment
- Circle cutter (optional)
- Ivory acrylic paint
- Glow in the dark paint (optional)
- Resin
- When deciding on which resin to use for your coasters, you need to keep in mind whether you want it just for cold cups or for hot ones as well.
- If only for cold drinks, you can be flexible and use whatever brand you like:
- If you want it to work for both hot and cold drinks, you need to look for a heat-resistant resin, like these:
- FX Poxy ~ According to the manufacturer, this one is heat resistant to 500° F.
- Stone Coat
Directions for the Hocus Pocus Coaster
1. Mix one ounce of resin, according to the package directions, mix in black resin pigment and pour it into the coaster mold. Use a lighter to pop the bubbles.
2. In the meantime, print out your image on transparency film.
TIP: When you buy transparency film, be sure you are buying it for the type of printer you have. The inkjet transparency film might not work in a laser printer and vice-a-versa.
3. Paint on the backside of the image with acrylic paint. In the case of the Hocus Pocus image, you want to paint only behind the witches and the cauldron.
4. Once dry, mix one ounce of resin and pour it into the coaster mold (on top of the black part that has cured).
5. Slide the image into the resin and press down with your stir stick. Keep pressing with the stir stick to get out all of the trapped bubbles. Then, pop with a lighter.
6. Allow it to cure and then remove it from the mold.
Witch Silhouette Coaster
There is nothing easier than a silhouette Halloween witch decor coaster. It looks like she is flying by the moon!
Supplies for Witch Silhouette Coaster
- Coaster mold
- Witch silhouette sticker
- Yellow resin pigment
- Resin
- When deciding on which resin to use for your coasters, you need to keep in mind whether you want it just for cold cups or for hot ones as well.
- If only for cold drinks, you can be flexible and use whatever brand you like:
- If you want it to work for both hot and cold drinks, you need to look for a heat-resistant resin, like these:
- FX Poxy ~ According to the manufacturer, this one is heat resistant to 500° F.
- Stone Coat
Directions for Witch Silhouette Coaster
1. Mix one ounce of resin, according to the package directions.
2. Mix in resin pigment and stir well.
3. Pour into coaster mold. Use lighter to pop bubbles. Allow to cure a minimum of 12 hours.
4. Apply sticker to cured resin.
5. Mix one more ounce of resin and pour over sticker.
6. Pop bubbles and allow to cure. Then unmold!
Witch Felt Coaster
Coasters don’t have to be clay, or concrete, or resin. They can be felt too. This is so fun and about the easier Halloween witch decor, you can make! You can get very creative and it’s perfect for kid participation! Who is to say you couldn’t have a girl’s night built around making felt coasters! After a few glasses of wine, I bet they would get extra good!
Supplies for Witch Felt Coaster
- Felt – green, black, purple, white, brown, and yellow
- Glue
- Scissors
- Paper punch (optional)
Directions for Witch Felt Coaster
1. Cut out the shape of the head from the green felt.
2. Cut out a large misshaped nose.
3. Cut out a triangle for the hat.
4. Cut out the brim of the hat.
5. Cut out a thin strip for a hat sash. (It’s late while I’m writing this. I know there is a better word that is currently eluding me….)
6. Cut out brown strips for hair.
7. Cut out yellow rectangles for teeth.
8. Cut out a frown from the black felt.
9. Cut out white circles for the eyes.
10. I used a paper punch to do the pupils. It worked surprisingly well.
11. Glue the pieces together.
Once dry, that’s it!
Now go make some coasters and have a Happy Halloween! Stay safe and Happy Crafting!
Mona

